Sheet Metal and Chassis Rigidity |
The picture at the right
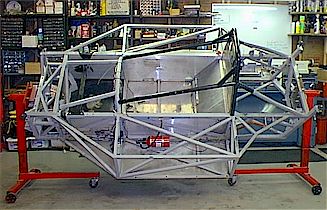 is of the “10” car’s chassis up on a
rotisserie I built. I built the rotisserie so I could easily work on the lower sheet
metal of the car. So why did I go to that trouble? Because proper installation of
the sheet metal of an SRF is critical to the overall rigidity of the chassis. The
more rigid a chassis is, the better the suspension is going to work and the more
predictable it will be. The process I used to get a good sheet metal installation is
detailed below: is of the “10” car’s chassis up on a
rotisserie I built. I built the rotisserie so I could easily work on the lower sheet
metal of the car. So why did I go to that trouble? Because proper installation of
the sheet metal of an SRF is critical to the overall rigidity of the chassis. The
more rigid a chassis is, the better the suspension is going to work and the more
predictable it will be. The process I used to get a good sheet metal installation is
detailed below: |
| Preparation |
| Remove all the sheet metal from the car. Everything. Be sure to save your old floor pan to use as a template for your new pan. Now is a great time to get the car sand blasted or chemically stripped of paint, glue and silicone sealer. Be sure to take the opportunity of a clean frame to check thoroughly for cracks in welds and in the tubes. Fix any you find first. It’s also a great time to get the frame powder coated...but be aware, that you will have to remove the powder coating (or any other finish) from the areas where you will be reinstalling sheet metal. Perhaps the best thing to do (in hindsight) is to mask off (using a high temperature, fiberglass masking tape) the areas where you will be be spreading glue later...and then send the frame to the powder coater. |
| Get the Sheet Metal Ready |
| If you’ve gone to all the
trouble of prepping the chassis, you should install new sheet metal if yours is dinged
up. I’d install a new floor pan regardless since it takes the most abuse and
you want to be sure to use the right material (both for chassis rigidity and
safety). Check out the rule book...it says in section 3.4.10, that you can fabricate
your own floor pan out of 0.060 inch aluminum. Some of the early cars came with
lighter gauge material. This is less desirable from both a safety and strength
perspective. I bought a sheet of 6061-T6, 0.060" sheet aluminum for about $140
in 1997 when I last did this. Using the old pan as a template cut out your new floor pan. Ideally, you would buy a sheet of aluminum large enough to make the floor pan in one piece, but it may be hard to find. The later model cars (and I believe the SCCA Enterprises replacements) are two pieces. Again, using the old pan as a template, drill all the rivet holes in the new floor pan. In regard to the front and rear bulkhead sheet metal, and side sheet metal, you decide whether to use your existing parts or buy new ones. If you use your old ones, be sure to clean off ALL remaining glue or silicone sealer that may be left on the metal. |
| Fit-Up, Countersinking and Materials |
| With your sheet metal ready to go and the powder
coated frame back, you want to do two things: one, fit up the sheet metal to be sure all
the rivet holes line up and that everything fits, and two countersink some of the rivet
holes for use with countersunk head rivets. I used countersunk rivets two places: on the side sheet metal and the rear bulkhead sheet metal inside the fuel cell cage. The idea here was to reduce potential abrasion of the fuel cell. I still covered all the rivets with duct tape as well. The second place I used countersunk rivets was the entire belly pan. While it probably was compulsive, my thought was to smooth out the undersurface of the car as much as possible to have the best possible undercar air-flow -- and thus lowest drag. You decide if you’re that compulsive. Regarding materials, you will need rivets -- I always used Avex brand. They are strong and easy to use...except that you should drill the holes with a #29 drill bit rather than a 1/8" bit. The part numbers I used were:1601-0414 for the domed head rivet, and 1604-0412 for the countersunk parts. Note that you will need to have a 120 degree single flute countersink to cut the recesses in the sheet metal. To actually cut the countersink recess, I would mount the sheet metal to the frame using Cleco style fasteners and then countersink the holes...moving the Cleco’s as required to access all the holes. It takes awhile, but hey, what are winters for anyway. In addition to the rivets, you will need an aircraft grade structural adhesive. I recommend a product called “T-88”. It is really strong and will cure at temperatures as low as 35F. In fact, if properly applied and cured, you could remove all the rivets and the floor pan would be just as strong and immovable as if all the rivets were still there. |
| Installation |
| Clean all the sheet metal panels and the area of the frame where the glue will go with acetone. Make sure you’ve got them clean! Working on one panel at a time (and starting with the side panels as I recall), mix enough T-88 glue to bond that panel to the frame. Spread the glue, put the panel in place using some Cleco’s and rivet the panel to the frame. Repeat this process for all the sheet metal panels. Be sure to clean your Cleco’s in acetone or lacquer thinner when you’re done so the fingers of the Cleco’s don’t get glued together. |
| Rev. 6/9/99 |
| Feedback |
| I welcome your comments or ideas on this information. Feel free to drop me
a line via “Comments for the Bro’s”. Barry |